
From Pixels to Thread: How Embroidery Files Are Digitized and Why It Matters
Embroidery digitizing transforms your digital logo into a precise stitch file ready for professional embroidery. This guide explains how it works, why it matters, and how Accent T-Shirts delivers expert logo embroidery in Las Vegas.
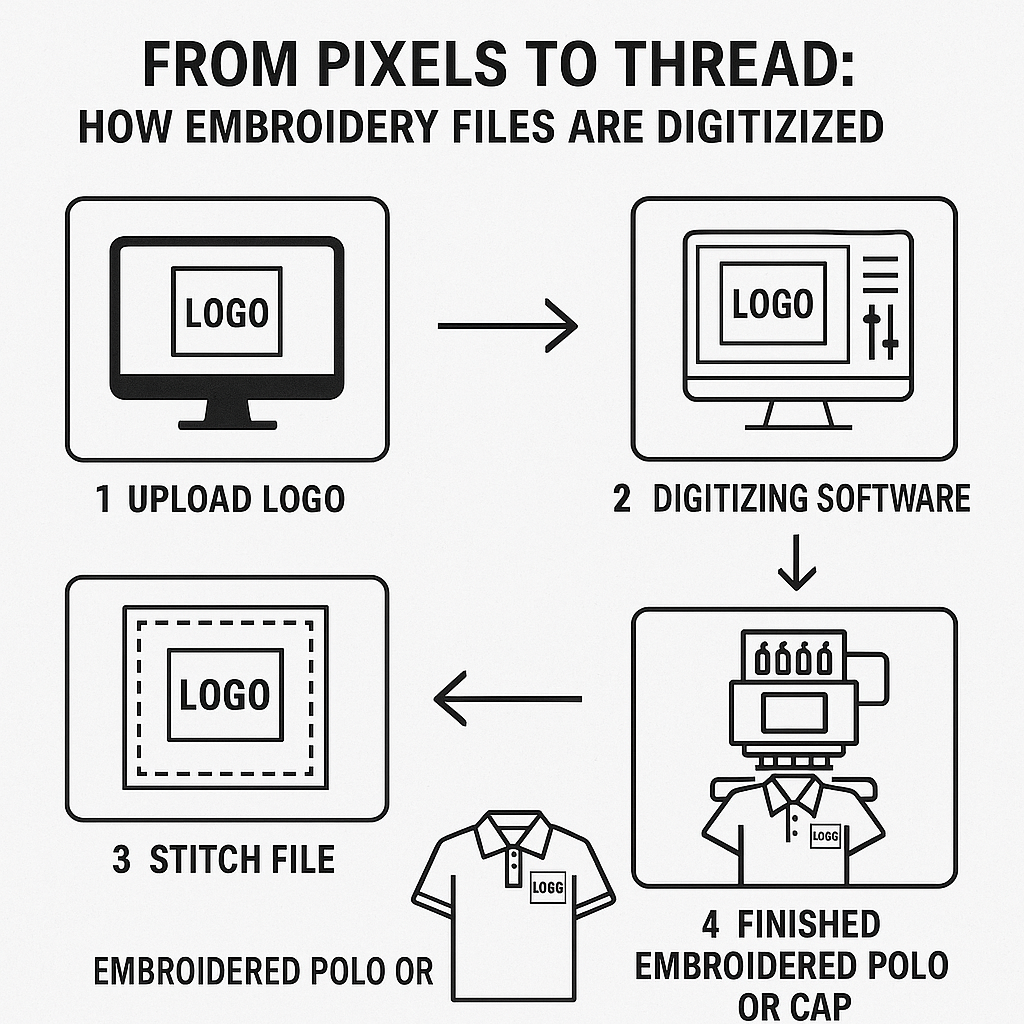
Small business owners often ask how we take a digital logo (the pixels) and turn it into beautiful stitched embroidery (the thread). The answer lies in embroidery digitizing – a crucial process that happens before any logo is embroidered onto a shirt or hat. If you’ve ever searched for embroidery near me to get your logo on apparel, understanding digitizing will help you appreciate what goes on behind the scenes. In this blog post, we’ll explain in simple terms what embroidery digitizing is, why it’s necessary for logo embroidery in Las Vegas (or anywhere), and how factors like stitch files, stitch types, density, and underlay all affect your final product. We’ll also share why quality digitizing impacts cost and appearance, what you should know when submitting your artwork, and the transparent process we follow at Accent T-Shirts to ensure your logo looks its best. Our goal is to educate and build trust, so you know you’re getting value from a local provider who believes in quality and transparency.
What Is Embroidery Digitizing?
Embroidery digitizing is the process of converting a digital image or design (like your company’s logo) into a set of stitch instructions that an embroidery machine can read. In other words, it’s a way of translating your artwork into a special language of stitches. Using professional digitizing software, a skilled technician (digitizer) maps out the design in terms of stitch type, direction, and density so the embroidery machine knows exactly how to recreate it with. Think of it as creating a blueprint for the machine: the digitized file tells the machine where to put each stitch, how to sew it (for example, a smooth satin stitch or a filling stitch), and when to change thread colors. This step is not automatic – it requires human expertise and is often considered an art form in itself. By digitizing your logo, we ensure that the embroidery machine can stitch your design accurately and consistently every time.
Why Is Digitizing Necessary for Logo Embroidery?
You might wonder why this extra step is necessary – can’t an embroidery machine just use the image of your logo directly? The simple answer is no. An embroidery machine cannot interpret a regular image file (like a JPEG or PNG) the way a computer screen does. It needs a digitized stitch file with specific instructions; otherwise, it wouldn’t know where or how to stitch your designdigitizeareus.com. Digitizing is essential because it bridges the gap between the visual design and the physical act of stitching. It turns your flat artwork into a stitch-by-stitch plan, ensuring the final embroidered logo looks like the original design. In fact, without proper digitizing, even a great design can sew out poorly – details might be lost, outlines could misalign, and the overall quality would suffer. Digitizing is what makes it possible to take your company’s pixels (the digital logo file) and transform them into threads on fabric with consistent, high-quality resultspodbase.com. It’s the foundation of any professional logo embroidery job.
Stitch Files: The Blueprint of Your Embroidered Logo
The output of the digitizing process is a stitch file (embroidery file), which acts as the blueprint for your embroidered logo. This file (often in a format like .DST, which is widely used by commercial embroidery machines) contains all the information the machine needs to sew your designrushordertees.com. You can think of it as a very specialized kind of file, similar to how a PDF contains document layout or a JPEG contains image pixels – except a stitch file contains instructions for needle and thread.
What’s inside a stitch file? It includes details such as the stitch types to use (e.g. satin stitches for borders or fill stitches for large areas), the sequence or order in which different parts of the design are stitched, where to make color changes (for multi-color logos), the specified stitch density (how close the stitches are), and even commands for jump stitches or trims (telling the machine to move or cut thread without stitching)geniusdigitizing.com. In short, the stitch file is a complete plan that tells the embroidery machine exactly how to recreate your logo in thread. This is why having a good stitch file is so important – a well-prepared file ensures the machine can run smoothly and the embroidery will come out looking crisp and accurate.
(Fun fact: If you already have a digitized embroidery file for your logo from a previous project, you can provide it to your embroidery shop. Embroidery machines can use that file directly to sew your design, potentially saving you time and the cost of re-digitizing.)
How Stitch Types, Density, and Underlay Affect the Final Product
When your logo is digitized, the technician makes several important decisions about stitches and settings that will greatly impact how the finished embroidery looks and feels. The main factors include stitch types, stitch density, and underlay stitches. Here’s a simple breakdown of each and why they matter:
Stitch Types: Different parts of your design may use different stitch types. The two most common are satin stitches and fill stitches. Satin stitches create smooth, continuous lines of thread with a glossy finish – ideal for borders, text, and small shapes, giving a polished look. Fill stitches (also known as tatami stitches) are used to cover larger areas; they sew back-and-forth in rows, creating a textured fill that covers the fabriczdigitizing.com. In essence, satin stitches are great for defined, narrow areas and lettering (they appear as thick, shiny columns of thread), while fill stitches are used for big, solid areas (they produce a flat, textured field of stitches). A good digitizer chooses the appropriate stitch type for each element of the logo so that it looks sharp – for example, using satin stitching for a small text outline, and a fill stitch for a big background shape, ensuring optimal coverage and detail.
Stitch Density: Density refers to how close together the stitches are placed. It’s basically the stitch coverage in a given area. A higher density means stitches are tightly packed; a lower density means they are more spread out. Getting the density right is critical. If the stitch density is too high, the design area can become stiff and overly thick, and you may even experience issues like thread breaks because too much thread is crammed into the fabriccoats.com. If the density is too low, you’ll see gaps or “grin”, where the garment’s fabric shows through the stitches, making the embroidery look sparse or inconsistentcoats.com. A quality digitizer will adjust density based on the fabric and the design – for instance, stitching on a cap or thick jacket might tolerate a higher density for a bold look, whereas a thin T-shirt may require a slightly lighter density to drape nicely. The goal is to ensure solid coverage without overdoing it, so the logo looks clean and the garment isn’t weighed down by thread.
Underlay Stitches: Underlay is like the hidden foundation of an embroidery design. These stitches are laid down before the visible parts of the design are sewn. You won’t typically see them in the finished logo, but they play a vital role in quality. Underlay stitches help stabilize the fabric, providing a base that prevents the design from shifting or puckering. They also create a platform for the top stitches to sit on, which can prevent thread from sinking into plush or stretchy. For example, on a polo shirt or hoodie, a proper underlay will keep the embroidery edges crisp and ensure the fill stitches have something to latch onto, resulting in a more even surface. Underlay can be a simple run stitch under a column or a light grid of stitches under a filled area. Choosing the right underlay and placement is part of the digitizer’s expertise. It even impacts the design’s density – a good underlay means the top layer can sometimes be less dense because the underlay already provides support and coverageabsolutedigitizing.com. In short, underlay stitches are the unsung heroes that contribute to a durable, high-quality embroidered logo: they keep everything in line and looking smooth, especially after the item is washed or worn.
By carefully adjusting stitch types, density, and underlay during digitizing, we ensure the final embroidered product not only looks as close to the original design as possible, but also has the right feel (not too heavy or stiff) and durability. These factors might sound technical, but they are exactly what differentiate a professional embroidery result from a mediocre one. When you run your fingers over a well-embroidered logo and see that the details are crisp and the patch lies nicely on the fabric, it’s thanks to these behind-the-scenes digitizing choices.
(For those curious, stitch files contain all these decisions. They are truly the blueprint – listing whether an area is satin or fill, how dense the stitching is, and where the underlay goes, among other details. The embroidery machine follows this blueprint to produce the final piece.)
Why Digitizing Quality Impacts Cost and Appearance
Not all digitizing is equal. The quality of the digitization can dramatically affect both the look of your embroidered logo and the cost of producing it. Here’s why:
Appearance: A well-digitized design means that every stitch is planned thoughtfully – the result is an embroidery that closely matches your original artwork in shape, proportions, and detail. High-quality digitizing ensures that stitches lay properly, angles are correct, and details like small text come out clean. On the other hand, poor digitizing can lead to a host of visible problems: outlines might not align, shapes can distort, and you might see gaps or uneven areas. Worst of all, you might encounter frequent thread breaks or loops. Imagine an embroidered logo where some letters are thicker than others, or the threads keep fraying – that’s often the result of subpar digitizing. As mentioned earlier, the digitizer’s choices affect whether the design sews out smoothly. Poor digitizing can cause uneven stitching, thread breaks, or fabric puckering, which all compromise the quality of the finished pieceeagledigitizing.com. In contrast, high-quality digitizing allows the design to be replicated consistently across different items and even scaled (within reason) without losing clarityeagledigitizing.com. This means your logo looks great on a single polo shirt or a batch of caps, with sharp lines and accurate colors.
Cost and Efficiency: You might notice that embroidery services often charge a digitizing fee (sometimes called a setup fee) when you submit a new logo. This fee accounts for the time and expertise required to create that high-quality stitch file. Quality digitizing is a labor-intensive process done by experienced professionals using specialized software – it’s not something automated that comes free. In fact, experienced digitizers who produce top-notch files (with minimal thread breaks and efficient stitch counts) tend to charge higher prices for their workoddinfotech.com. The good news is that this is usually a one-time cost per design; once your logo is digitized, you can reuse that file for future embroidery orders without paying again. Opting for quality pays off because a well-digitized logo often has an optimized stitch count – no more stitches than necessary – which can save you money when you’re paying per thousand stitches in embroidery. It also runs faster on the machine with fewer hiccups (like thread breaks or misalignments), which means less time and material wasted. In contrast, a cheaply digitized file might be inefficient: it could include too many stitches or poor sequencing that makes the machine sew longer than it needs to, driving up production time. It might even cause errors that require redoing the work. So, while high-quality digitizing might cost a bit more upfront, it ensures a smoother production and a beautiful final appearance, ultimately offering better value. As one industry guide notes, digitizing determines the outcome of the design – every stitch in the right place, with the right tension and order, so that the embroidered logo maintains its intended look. This level of precision is critical for professional results, which is why it’s worth investing in good digitizing from the start.
In summary, the digitizing stage is not the place to cut corners. The quality of this digital blueprint directly affects how good your logo will look in thread. It can also influence the cost, both in terms of setup and the efficiency of the embroidery itself. At Accent T-Shirts, we believe in doing it right the first time – a well-digitized logo means you get a product that you’re proud to wear and that we’re proud to deliver.
Tips for Small Businesses: Submitting Artwork for Embroidery
If you’re a small business owner preparing to get your logo embroidered, there are a few things to know that will make the process smoother and ensure the best outcome. Here are some key tips for submitting your artwork for embroidery:
Provide High-Quality Artwork: The quality of your logo file influences the digitizing process. For the best results, send your logo in a vector format (such as an AI, EPS, or PDF file) if possible, or a high-resolution image (like PNG or TIFF) at the size you want it embroideredtitangraphics.com. Vector files are ideal because they can be scaled and have clear detail. If a vector isn’t available, make sure the image is not pixelated; a good rule of thumb is at least 300 DPI at the actual size you want the embroidery to be. Remember, the better the art we get, the better the end result will betitangraphics.com. Avoid small, low-resolution web images or photos of logos, as those may need to be redrawn before digitizing, which can add time and cost.
Keep Design Details Embroidery-Friendly: Embroidery has different limitations than print. Small details that look good on a screen might not translate well to thread. As a general guideline, avoid extremely tiny text or thin lines in your design. For example, letters shorter than about 0.25 inches (6mm) in height may not sew legibly with standard stitchingtitangraphics.com. Our digitizers might have to simplify or omit details that are too fine to stitch. Similarly, very thin lines might need to be slightly thickened or done in a running stitch. It’s helpful if your artwork is designed with solid shapes and clear boundaries – this way, the embroidery will turn out crisp. If your logo has color gradients or photographic elements, be aware that the embroiderer will interpret these as solid areas or patterns of stitches (since threads can’t do true gradients easily). We can certainly embroider complex designs, but sometimes less is more for a clean embroidered look.
Specify the Embroidery Size and Placement: When you submit your logo, let us know the intended size (e.g., 3 inches wide for a left-chest logo) and the placement (such as on a hat, chest of a polo, or sleeve). The digitizing process can vary based on size and fabric. A logo digitized for a large jacket back might need different settings than the same logo scaled down for a small chest embroidery. In fact, once a design is digitized, it can only be resized slightly (around 10-15%) without losing quality; a significant size change usually requires a new digitization to adjust stitch types and density properlytitangraphics.com. So, knowing the target size upfront helps get the digitizing right the first time. Additionally, tell us about the garment or fabric if it’s unusual – for instance, if it’s a thick canvas bag or a stretchy performance shirt – so we can choose the best underlay and backing. Our team may use a different approach for structured caps versus flat garments, for example. Sharing these details ensures we tailor the digitizing to your specific needs.
Understand the Digitizing Fee (One-Time): Most embroidery shops (including Accent T-Shirts) charge a one-time digitizing or setup fee for new logos. This fee covers the work to create your logo’s stitch file. The good news is that once your logo is digitized, you can use that file indefinitely for future orders without paying again. If you plan to embroider your logo on different items down the line, you won’t incur that digitizing fee each time – we’ll simply reuse the existing stitch file (or tweak it if necessary for a different size or item). We’re transparent about this cost up front so there are no surprises. Also, if you already have a digitized file from another vendor, provide it to us – it might save you this fee as long as the file is compatible and well-made. Our goal is to maintain quality while being fair and efficient with costs, and we’ll happily explain any pricing questions you have about embroidery and digitizing.
Ask for a Proof if You’re Unsure: It’s important that you’re confident in how your embroidered logo will look. If you have any concerns, ask for a stitch-out proof or a digital simulation of the embroidery. At Accent T-Shirts, we usually provide a digital proof of your logo showing the stitch layout, size, and colors for approval before we proceed to production (especially for larger or more complex orders). This is your chance to double-check that everything looks right – placement, spelling, colors, etc. – before we stitch on all your garments. We value open communication and want you to feel comfortable. Don’t hesitate to discuss thread color matching (for example, providing Pantone colors or thread codes if you have brand colors), or any adjustments you might want. We’re here to work with you to get it perfect.
By following these tips, you help us ensure the embroidery process goes smoothly and that you get the best possible representation of your brand in thread. We love when customers are engaged and informed – it makes the end result that much better!
Our Embroidery Digitizing Process at Accent T-Shirts
At Accent T-Shirts, we take pride in our in-house digitizing and embroidery capabilities. Being a local Las Vegas shop with our own team of experts means we have full control over quality and turnaround time (no outsourcing, which keeps things fast and consistent). Here’s a transparent look at the process we follow when digitizing your logo for embroidery:
Artwork Review & Consultation: Everything starts with your design. When you send us your logo or artwork, our team first reviews the file. We check the quality of the image and discuss with you the intended size, placement, and garment type. If the artwork is low-resolution or needs tweaking to be embroidery-friendly, we’ll let you know and can assist in cleaning it up or converting it to the right format. Our goal at this stage is to fully understand your vision and any specific requirements (for example, you want the logo 4 inches wide on left chest, and maybe you prefer a specific shade of blue thread for the text).
Digitizing the Design: Once we have the artwork squared away, our skilled digitizer gets to work using professional embroidery software. This is where “pixels to thread” truly happens. We manually plot out the design’s stitch pattern on the computer screen. For each part of your logo, we choose the appropriate stitch type (satin, fill, run, etc.), set the stitch direction (this can affect how light reflects on the thread and how the tension pulls on the fabric), and adjust the stitch density to suit the fabric and desired texture. We also add underlay stitches where needed to stabilize the design. For multi-color logos, we sequence the color changes logically (usually background elements first, details and text last) so the machine runs efficiently. This step is both technical and artistic – our digitizer uses their experience (backed by over 25 years of serving Las Vegas businesses) to anticipate how the stitches will actually sew out on the real garmenteagledigitizing.comeagledigitizing.com. The outcome of this step is the creation of the stitch file (for example, a DST file) for your design.
Quality Check – Digital Proof & Sample Sew-Out: Before we embroider your actual items, we perform a quality check on the digitized file. We generate a digital proof – a simulated preview of the embroidery – and share it with you for approval. This shows the placement, approximate stitching, and thread colors. We encourage you to review it and give us feedback or approval. For intricate or large designs, or if we’re working with a tricky fabric, we may even do a test sew-out on a swatch of similar material. This allows us to see how the embroidery physically turns out and make any fine adjustments (for instance, tweaking density if we see any small gaps or tightening some underlay if we notice puckering). We treat this step seriously because we want the final product to be perfect. It’s far better to catch and correct any issue in a test than on your actual apparel.
Embroidery Production: With a perfected stitch file and your approval, we move to production. Our team loads your garment onto the embroidery machine and uploads the digitized file. Because of the careful prep work, the machine can now run the design with confidence. One of our experienced embroidery operators monitors the run – even with a great file, we keep an eye out to ensure threads don’t run out and everything stays aligned. Each color change and stitch follows the plan we set in the digitizing stage. After the machine finishes, we do a finish trim and inspection. This means trimming any jump threads (threads between sections) and comparing the embroidered logo to the artwork to ensure it’s up to our quality standards. We check that all details came out as expected, and the registration (alignment) is spot on. If something isn’t right, we halt and address it (though our thorough digitizing process makes issues unlikely). Finally, we’ll press or steam the embroidered item if needed so it looks crisp and presentable.
Delivery and Feedback: We deliver your embroidered products, whether it’s a batch of company polos, hats, uniforms, or promotional items. But our process doesn’t end there – we value your feedback. We stand by our work, so if you notice anything about the embroidery that you have questions on, we’re here to help. Our aim is that you’ll immediately see the quality in the clean stitching and durability of your logo. We keep your digitized logo file on hand for future orders, making reorders easy and fast (no need to digitize again). As your trusted Las Vegas embroidery shop, Accent T-Shirts wants you to feel confident that your brand’s image is in good hands from start to finish.
By walking you through our process, we hope you see the care and expertise that goes into every embroidered logo. From that initial pixel-based design you give us to the final thread-stitched product, we emphasize precision, quality, and communication. Embroidery digitizing is both a science and an art, and we’ve mastered it so we can bring your logos to life in the most vibrant and reliable way.
In conclusion, understanding embroidery digitizing helps demystify why getting a logo embroidered isn’t as simple as hitting “print.” There’s a lot of craftsmanship involved in going from pixels to thread. For small businesses, this knowledge isn’t just trivia – it means you can work better with your embroidery provider (hopefully us at Accent T-Shirts!), plan your branding materials more effectively, and appreciate the value you’re receiving. High-quality digitizing ensures that your embroidered logos will represent your brand beautifully with clean lines, correct colors, and longevity. It also means fewer headaches and surprises in production. We believe in transparency and education; when you come to Accent T-Shirts for logo embroidery in Las Vegas, you can trust that we’ll guide you through the process, charge fair prices, and deliver top-notch work. Your logo is the face of your business – when it’s embroidered on a shirt or cap, it should look fantastic. With the right digitizing and embroidery team behind you, it will.
Have questions about embroidery digitizing or want to get your logo embroidered by a local, experienced team? Feel free to reach out to us at Accent T-Shirts – we’re here to help, every stitch of the way.