
Embroidery on Jackets & Thick Items: What It Can (and Can’t) Do (Before You Order)
Planning embroidery on jackets, hoodies, Carhartts, fleece, and thick outerwear? Learn what works, what fails, and how to avoid puckering, distortion, and thread breaks.
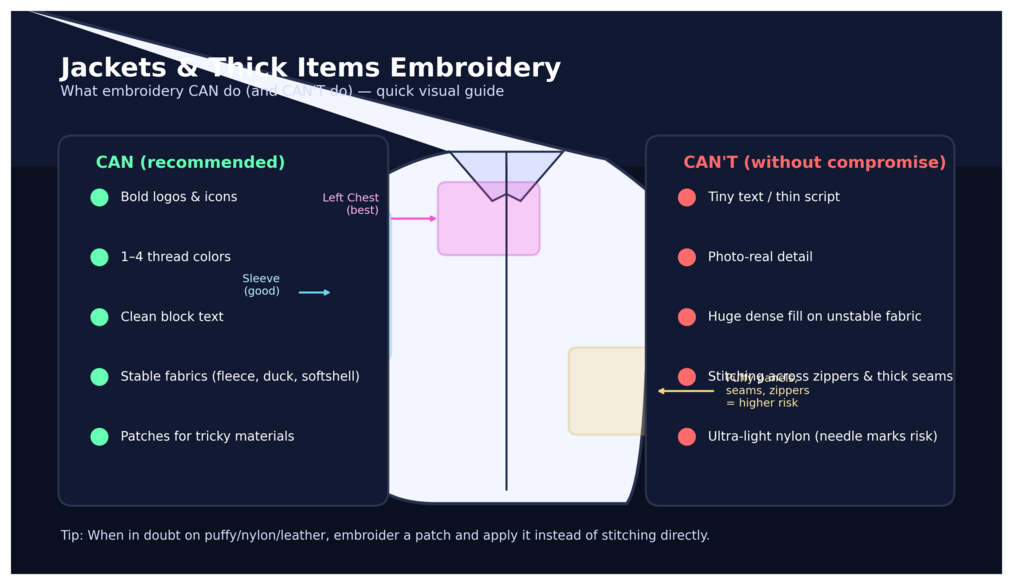
Embroidery looks premium. It lasts. It feels like a uniform. And it’s often the best decoration method for jackets, outerwear, and workwear.
But jackets aren’t t-shirts.
Thicker fabrics, linings, zippers, seams, stretch panels, and insulation change everything—how the needle penetrates, how the fabric behaves under tension, how clean fine detail stays, and how the logo looks once the garment is worn and moving.
If you’re ordering embroidered jackets (or bringing in your own), this guide will save you from the most common disappointments:
- tiny text that turns into thread soup
- puff jackets that pucker or “dent” around the logo
- nylon shells that get needle marks
- thick seams that make lettering look uneven
- logos that look crooked because the jacket isn’t flat
- placement that accidentally lands on a pocket seam or zipper
We’ll cover what embroidery can do beautifully on thick garments, what it can’t reliably do, what to do instead when you hit a limitation—and what to tell your embroidery shop so your first proof is right.
1) The Big Idea: Jackets Are Not a Flat Canvas
On a t-shirt, you can lay the garment flat and print or embroider with predictable tension. Jackets are different because they often include:
- multiple layers (outer shell + lining + insulation)
- bulky seams and topstitching
- zippers, snaps, pockets, storm flaps
- stretchy softshell panels
- slippery nylon or water-resistant coatings
- heavy canvas or duck fabrics
- quilting and baffles (puffy jackets)
All of those features affect how embroidery behaves.
Why this matters
Embroidery is essentially controlled “punctures” with thread. If the needle and thread pull the fabric unevenly—especially with thick or unstable materials—you can get:
- puckering (wrinkles around the logo)
- distortion (circles become ovals, text waves)
- poor registration (elements shift)
- thread breaks (especially on thick/abrasive fabrics)
- needle deflection (needle bending slightly on thick layers)
The goal isn’t to avoid embroidery on jackets. The goal is to design and place embroidery the way jackets “want” to be decorated.
2) The Best Jackets for Embroidery (Easiest → Hardest)
If you’re choosing garments specifically for embroidery, here’s a practical ranking.
Easiest / Most reliable
Heavy fleece, stable softshell, canvas/duck (with the right setup), structured work jackets
These generally hold embroidery well because they’re stable and don’t shift too much in the hoop.
Medium difficulty
Hoodies, midweight jackets, lined garments
Works great, but placement and stabilization matter more.
Harder / Higher risk
Nylon shells, waterproof/resistant jackets, puffy/baffled jackets, very stretchy softshell panels
Embroidery can still be done, but the design must be simpler, and the shop must use the right stabilizers, needles, and technique.
Highest risk / Specialty
Leather, very thick insulated parkas, ultra-light packable jackets, coated rain shells
These often require special handling, and sometimes embroidery is not the best choice at all.
3) What Embroidery Can Do Really Well on Thick Items
Let’s start with the good news: when embroidery is matched correctly to the garment, it’s one of the best-looking and longest-lasting decoration methods available.
Embroidery is excellent for:
1) Corporate logos and uniform branding
Left chest embroidery on jackets looks professional and consistent across a team.
2) Simple bold marks
Clean icons, block letters, and simple shapes stitch beautifully.
3) Durable workwear
Embroidery holds up extremely well under abrasion and wash cycles on many workwear fabrics.
4) Limited colors
Embroidery thread colors are consistent and don’t fade like some inks can, especially in harsh work environments.
5) Patch-style looks
Even if the jacket fabric is tricky, you can often embroider a patch and apply it.
4) What Embroidery Can’t Reliably Do (Without Compromise)
Here are the most common “ask vs reality” issues.
1) Ultra-small text (especially on thick jackets)
Small lettering is the #1 fail point.
Why it fails:
Thread has thickness. Satin stitches have minimum widths. On thick fabrics, the stitches sink or spread slightly, and tiny letters fill in.
Practical rule of thumb:
- Avoid text smaller than about 0.25" tall on jackets
- For clean readability, 0.30"–0.35"+ is safer
- Thin script fonts fail faster than bold sans serif fonts
2) Extremely fine details
Hairline strokes, tiny outlines, and intricate line art won’t stitch cleanly, especially on textured fabrics like fleece.
3) Photorealism
Embroidery can do shading and complex fills, but it’s not photography. If the goal is a full-color detailed illustration, embroidery may not be the right choice.
4) Huge filled areas on unstable fabric
Large solid stitch fills can pull and pucker. The heavier the fill, the more the garment must be stabilized.
5) Embroidering directly across thick seams, zippers, or pocket edges
Needles hate inconsistent thickness. Stitching across bulky seams can cause:
- uneven stitch density
- thread breaks
- poor readability
- distortion
5) The Jacket Types Everyone Asks About (And How to Approach Each)
A) Carhartt / Duck Canvas Work Jackets
These are popular for branding and generally embroider well.
What works best:
- left chest logos
- simple icons
- block text
Watch-outs:
- very thick seams and topstitching
- stiff fabric can deflect the needle slightly
- placement must avoid seam buildup and pockets
Best practice:
- keep designs clean and bold
- avoid tiny text and thin script
- plan placement away from heavy seam intersections
B) Fleece Jackets
Fleece is common and comfortable, but it has “nap” (texture).
What works best:
- medium-to-large logos
- bold satin lettering
- patches
Watch-outs:
- fine details get swallowed by texture
- small text looks fuzzy
- outlines can disappear
Best practice:
- increase line thickness
- simplify artwork
- consider a patch for small detail logos
C) Softshell Jackets
Softshells can be stable, but some have stretch panels.
What works best:
- left chest logos
- sleeve logos
- medium complexity designs
Watch-outs:
- stretching can cause puckering if not stabilized
- waterproof membranes can show needle marks
- some softshells require special needles
Best practice:
- use proper cutaway stabilizer
- avoid tiny text
- test for hoop marks and needle visibility
D) Puffy / Quilted Jackets
These are the most common “it looked bad” category if not planned correctly.
Why it’s tricky:
- quilting shifts
- insulation compresses, then expands
- the fabric is rarely flat
- embroidery can “dent” the puffy panel and pucker around it
Best practices:
- keep logos simple and not too dense
- avoid huge fills
- avoid small text
- consider a patch application instead
- choose placements on flatter panels (if available)
Sometimes the best answer is: embroider a patch and sew/heat apply it, rather than stitching directly into the puff panel.
E) Nylon Windbreakers / Packable Jackets
Nylon is slippery and can show needle holes.
Best practice options:
- patches
- applique
- or heat-applied options depending on the garment’s coating
If you embroider directly:
- keep design light and not overly dense
- avoid big fill areas
- use correct needles and stabilization
F) Leather Jackets
Leather is a specialty material. Needles make permanent holes. If you mess up, you can’t “wash it out.”
For leather, patches are often the safest and best-looking route:
- embroidered patch stitched on
- or adhesive-backed patches for certain items (with caution)
6) Stabilizers: The Unsexy Secret to Good Jacket Embroidery
If you’ve ever seen puckering around embroidery, that’s often a stabilizer issue (or a density/design issue).
Stabilizer is the material used to:
- keep the garment from shifting in the hoop
- support stitching so it stays crisp
- reduce pulling and distortion
Common stabilizer types (simplified)
- Cutaway stabilizer: stays in place behind the stitch. Great for knits, stretch, and jackets.
- Tearaway stabilizer: tears off after. Often used for stable fabrics, not always ideal for jackets.
- Water-soluble topping: sits on top of textured fabrics (like fleece) to prevent stitches sinking into the nap.
Most jacket embroidery benefits from cutaway stabilizer, and fleece often benefits from a water-soluble topping.
7) Density: Why “More Thread” Isn’t Always Better
People sometimes think the best embroidery is the densest embroidery. On jackets, density can be a problem:
- dense fills pull the fabric
- dense stitching on puffy jackets causes dents
- high density increases thread breaks on thick seams
- dense designs feel stiff
A quality shop adjusts density based on:
- material thickness
- stretch
- texture
- design type
Sometimes “lighter” embroidery looks better and wears better.
8) Best Placements on Jackets (And Where to Avoid)
Most reliable placements
- Left chest: the classic and most stable area
- Right chest: good for names/roles
- Upper back yoke: depends on jacket construction, but often works
- Sleeve: great if the sleeve is stable and not too tight
Avoid or plan carefully
- directly on pockets
- across zipper lines
- over bulky seam intersections
- near drawcord channels or hidden zippers
- very low on the front where the jacket bends/creases constantly
9) Small Text Rules for Jackets (Do This and You’ll Save Money)
If you take nothing else from this article, take this:
The smallest jacket embroidery text that still reads well is usually larger than you think
General recommendation:
- 0.30"–0.35" tall letters for reliable readability
- Avoid thin fonts and script
- Use bold sans serif fonts
- Increase spacing between letters
If your logo has a tiny tagline, consider:
- removing it
- moving it to print instead
- using a patch
- or enlarging the whole mark
Many jackets look better with a clean icon and company name—no micro tagline.
10) When You Should Choose a Patch Instead of Direct Embroidery
Patches are the secret weapon for difficult jackets.
Patches solve:
- puffy jacket denting
- nylon needle marks
- small detail logos
- inconsistent surfaces
- large orders with mixed jacket types
Common patch options:
- embroidered patch
- woven patch (great for small text)
- leatherette patch (popular on beanies/hats, sometimes jackets)
Patches can be:
- sewn on
- heat applied (depends on fabric/coating)
- or Velcro-backed (tactical/workwear style)
If your jacket is tricky, ask your shop:
“Would this look better as a patch?”
11) What to Tell Your Embroidery Shop (So You Get the Best Result)
When requesting a quote, include:
Garment type and material
- brand/style if known
- fabric content if possible
Where you want the logo
- left chest, sleeve, back, etc.
- mention if there are pockets/zippers nearby
Approximate logo size
- classic left chest is often around 3.5"–4.25" wide
- sleeve varies more (commonly 2.5"–4" wide)
Artwork file type
- vector is best (AI, EPS, SVG, PDF)
- high-res PNG also works in many cases
Any concerns
- “We need the small text readable”
- “These are puffy jackets”
- “These are nylon shells”
- “This is a Carhartt-style duck jacket”
A good shop will respond with:
- size recommendations
- whether the design needs simplification
- whether patch is better
- digitizing expectations
- and any disclaimers for challenging items
12) Common Problems (And How to Prevent Them)
Problem: Puckering around the logo
Cause: too much density, wrong stabilizer, fabric shift
Prevention: cutaway stabilizer, appropriate density, good hooping
Problem: Small letters look filled-in
Cause: text too small, font too thin, fabric texture
Prevention: increase text size, use bold font, simplify
Problem: Logo looks crooked when worn
Cause: jacket doesn’t lay flat, placement referenced wrong seam
Prevention: measure from consistent points; use a proof on a template; mark placement carefully
Problem: Needle marks on nylon
Cause: needle holes are permanent
Prevention: patches or alternative methods; test first
Problem: Thread breaks constantly
Cause: thick seams, density, wrong needle, material friction
Prevention: avoid seam intersections; adjust density/needle; use experienced shop
13) Practical Recommendations (If You Want It to Look “Premium”)
If your goal is premium embroidered outerwear, follow this playbook:
- Choose a stable jacket type (softshell or structured fleece)
- Use a clean, bold logo (avoid tiny taglines)
- Keep it to 1–4 thread colors
- Use left chest placement for uniforms
- Consider sleeve branding for modern look
- Use patches for puffy, nylon, or complex logos
- Ask for a sewout photo (sample) if the order is high-stakes
Final Take: Embroidery on Jackets Is Amazing—When You Respect the Material
Embroidery can look incredible on jackets, workwear, and thick items—often better than printing. But thick and layered garments demand:
- the right placement
- the right stabilization
- the right design choices
- and realistic expectations for fine detail
If you keep designs bold, avoid micro-text, and choose patch options when the garment is tricky, you’ll get a result that looks professional and lasts for years.