
How to Embroider a Hat the Right Way: 3D Puff Guide
Want to master 3D puff embroidery on hats? Learn the professional techniques we use at Accent T-Shirts in Las Vegas for crisp, high-profile stitching. Get a quote!
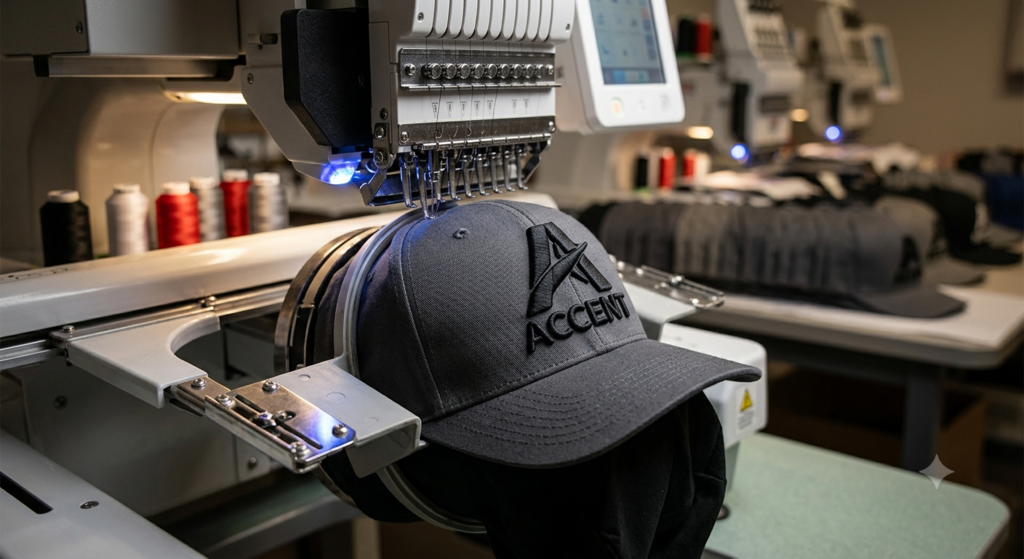
The Ultimate Guide to Custom Hat Embroidery: Doing It the Right Way (and Mastering 3D Puff)
Custom embroidered hats are a staple for Las Vegas businesses, event organizers, and local apparel brands. They are walking billboards that drive brand recognition.
But a poorly embroidered hat? It looks sloppy, the design wrinkles the fabric, and it can actually damage your brand.
At Accent T-Shirts, we have been the trusted local Las Vegas embroiderer since 1999. We know exactly how to handle different crown heights, fabrics, and, most importantly, how to execute perfect 3D puff embroidery.
Here is our professional breakdown of how to embroider a hat the right way.
Part 1: The Foundations of Quality Hat Embroidery
Whether you are doing a standard 2D stitch or preparing for a complex 3D puff design, you must nail the foundational steps. The challenge with caps is that they are structured and curved, making them significantly harder to hoop and stitch than a flat T-shirt.
Here are the critical elements of quality hat embroidery:
1. Hooping It Straight is Everything
The biggest mistake beginners make is hooping the hat crooked. A structured cap (like a Flexfit or Yupoong Classic) has a center seam that must align perfectly with the machine’s hoop center point. If it’s off by even 1mm, the final stitch-out will be slanted, and the hat is ruined. We use specialized hat-specific hooping stations to ensure perfect precision every time.
2. Using the Proper Backing/Stabilizer
You cannot embroider a structured hat without stabilizer, but you must use the right type.
- Standard structured hats: We use a heavyweight cap backing (often a heavy-duty cap canvas) inside the crown to give the stitches a solid foundation. This prevents the fabric from shifting and puckering around the design.
3. Choosing the Right Needles
For structured caps, we generally use a heavier sharp needle (like a 75/11 sharp). Structured caps have buckram (the stiff liner) in the front panels; a sharp needle easily cuts through the stiff buckram, fabric, and stabilizer without breaking thread or causing birdnests.
Part 2: What is 3D Puff Embroidery?
If you want your logo to truly stand out (literally), 3D Puff Embroidery is the solution. This is the process where we place a layer of actual foam under the top stitches, raising the design off the cap. This creates a bold, dimensional, high-profile look that looks incredibly premium.
Puff embroidery is popular for sports teams, streetwear brands, and corporate caps that want a bold presence.
What Types of Logos Work for 3D Puff?
Not every logo can be converted into 3D puff. To get a crisp result, your design must have:
- Simple, bold shapes: Complex, detailed logos with small text will turn into an illegible, foam-filled mess.
- Thick column width: The satin stitches that go over the foam must be wide enough to properly wrap the foam without tearing it.
- Clean lines: Designs with jagged or distressed textures do not execute well in 3D.
💡 Unsure if your logo works? Our design team can review your artwork and recommend if a standard stitch or a 3D puff approach will give you the best result.
Part 3: The Steps for Perfect 3D Puff Execution
This is where true professional expertise comes in. 3D Puff is not just "adding foam." It requires a completely different approach to digitizing (file creation) and production.
Step 1: Specialized Puff Digitizing
The file that works for a flat shirt will not work for puff. The digitizer must explicitly create the file with 3D instructions.
- Increased stitch density: We must add more satin stitches (the cover stitches) per millimeter to ensure the foam is completely covered and doesn’t show through.
- Capping stitches: The satin columns must have explicit "cap" stitches added. These horizontal stitches are placed at the beginning and end of columns to effectively seal the foam inside the satin cover, preventing it from poking out the top or bottom.
Step 2: Securing the Foam
During the stitching process, the machine will stitch out the underlayment, flat stitches, or base outline first. The machine will then pause. We physically place a sheet of density-matched EVA foam over the target area. The foam must be held flat (sometimes taped) before the main stitching resumes.
Step 3: The Final Stich-Out
The embroidery machine then runs at a very high speed over the foam, driving the needles through the foam sheet and back into the hat fabric. The dense satin stitches crush and lock the foam underneath them.
Step 4: Cleanup (The Proof of Quality)
This is where you see the difference. Once the machine is done, there will be excess foam surrounding the design.
- Standard process: We manually tear away the majority of the excess foam.
- Professional finish: To get a truly sharp edge with no visible foam "fuzz," we use specialized heat guns (gently applied) to shrink back any remaining micro-fibers, sealing the design edges perfectly.
Choose the Right Las Vegas Embroiderer for Your Caps
Embroidery on structured caps—and especially 3D Puff embroidery—requires specialized equipment, precision techniques, and a skilled workforce. When done right, it results in a premium, long-lasting hat that looks exceptional.
At Accent T-Shirts, we handle the entire process under one roof right here in the Las Vegas Valley. We pride ourselves on clear communication, hometown service, and delivering consistent high quality for every order, large or small.
Ready to start your order?
Let’s get your team or event outfitted with professional caps. Contact our Las Vegas team today.
📞 Call Us: (702) 866-8888 📍 Visit Us: 2545 chandler 11, 89120 ✉️ Request Your Free Quote: AccentTShirts.com/quote