
What Is a Screen in Screen Printing? (And Why Setup Costs Exist)
Learn what a “screen” actually is, how screens are made, and why setup fees exist in screen printing. See what impacts cost: colors, size, detail, and rush jobs.
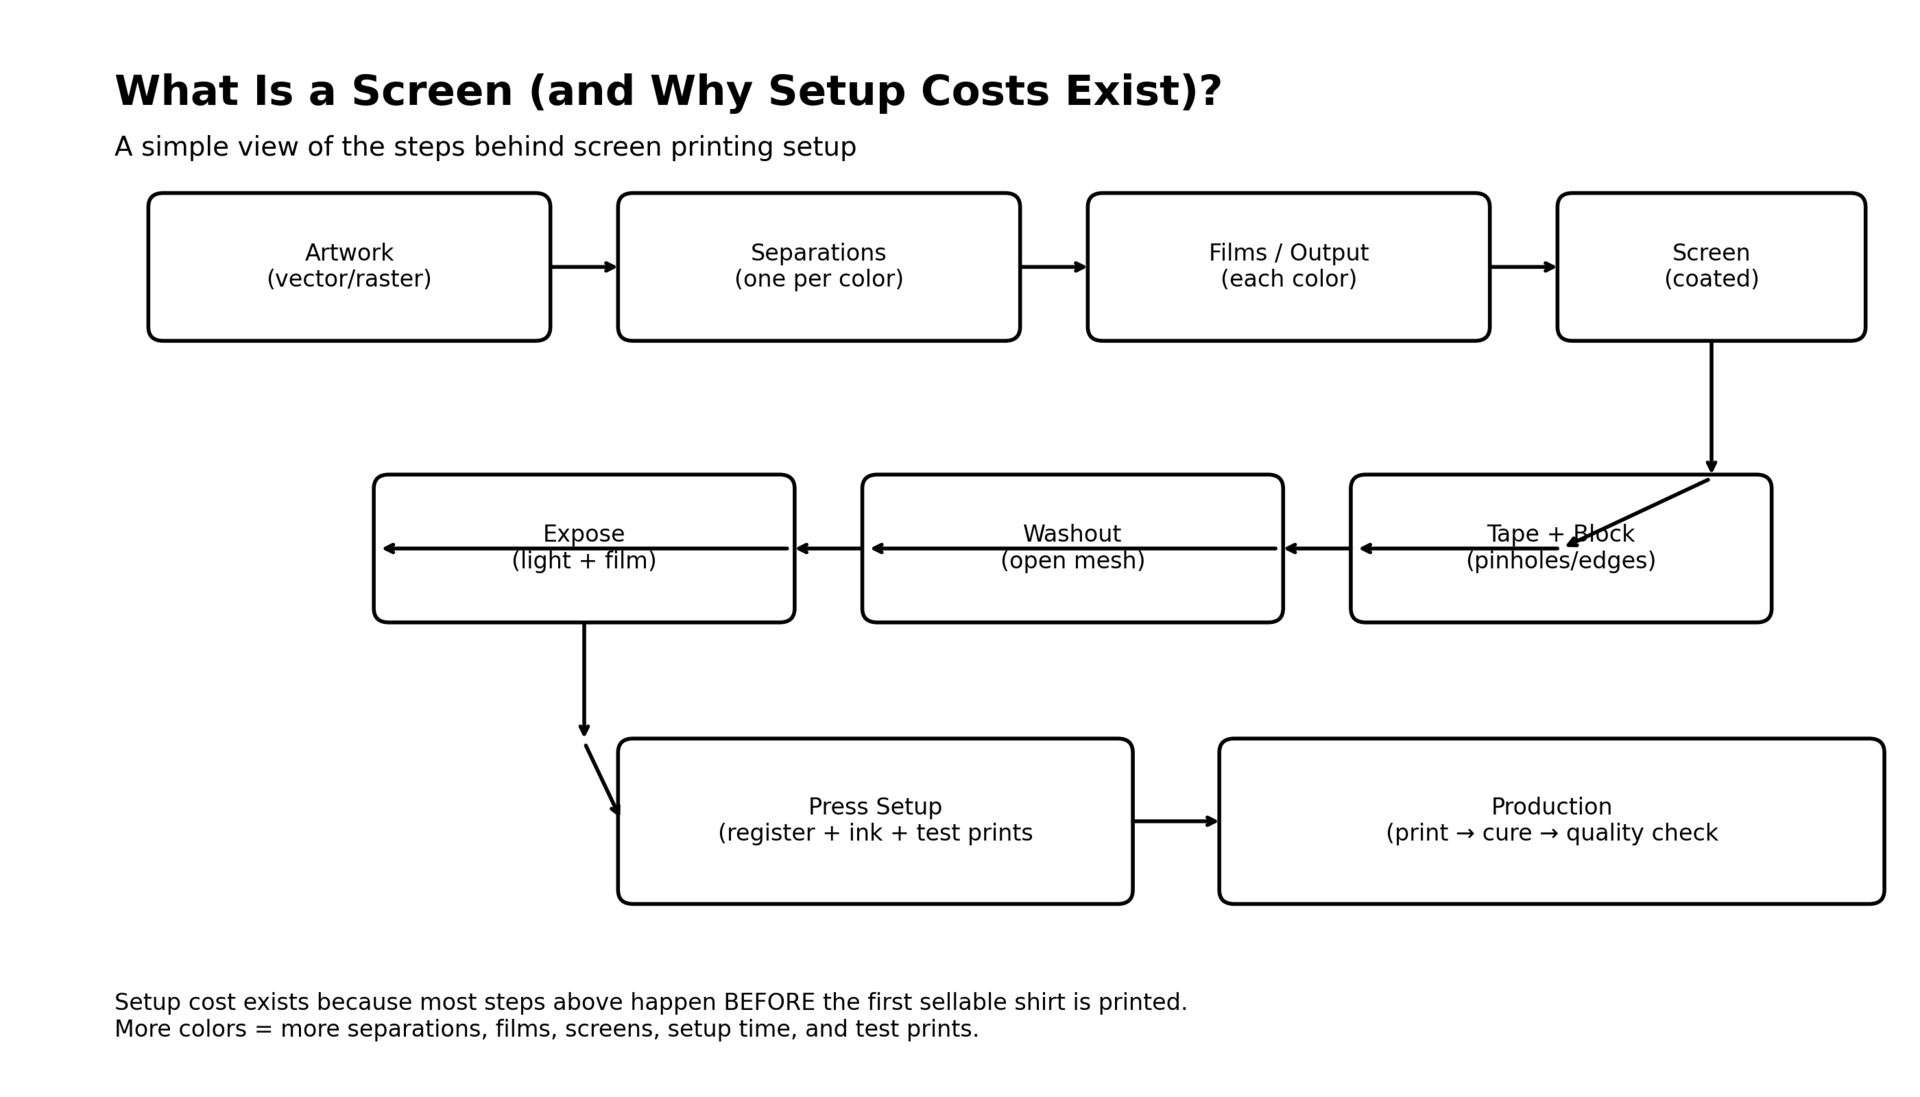
If you’ve ever requested a quote for custom shirts and noticed a setup fee (sometimes called “screen fee,” “art fee,” or “screen charge”), you might’ve wondered why it exists—especially when you’re ordering more than a few shirts.
Here’s the simplest truth:
A screen print isn’t “press print” like printing a document.
Before the first shirt can be printed, a shop has to build the tool that makes the print possible. That tool is the screen—and the steps required to create it are what the setup cost pays for.
This guide breaks it down in normal language:
- what a “screen” really is
- how it’s made
- what setup fees cover
- why “per color” matters
- when setup is worth it (and when it’s not)
- how to lower setup costs without lowering quality
Whether you’re ordering 24 shirts or 2,400, you’ll walk away understanding exactly what’s happening behind the scenes—and why setup fees aren’t a “random add-on.” They’re the real cost of turning your design into a production-ready print.
1) What Is a “Screen” in Screen Printing?
A screen is basically a frame with a tightly stretched mesh (think of it like a super-fine fabric) that acts as a stencil.
When a screen is prepared for a specific design:
- certain parts of the mesh become “blocked”
- certain parts remain “open”
- ink is pushed through the open areas onto the garment
- the blocked areas prevent ink from passing through
So the screen becomes a custom stencil made for your artwork.
The best mental image
Imagine a window screen (mesh) stretched tight in a frame. Now imagine you could “close” certain holes permanently so ink only passes through the shape of your logo. That’s a screen.
Why it’s called screen “printing”
Because ink is printed through the screen using a squeegee or press.
2) Why a Screen Has to Be “Made” for Each Design (and Often Each Color)
In modern screen printing, your artwork is rarely cut out by hand. Instead, screens are created using a light-sensitive coating called emulsion and an exposure process that turns your design into a clean stencil.
Most importantly:
In traditional screen printing, each ink color usually requires its own screen
So:
- 1-color design → typically 1 screen
- 2-color design → typically 2 screens
- 6-color design → typically 6 screens
That’s why you’ll hear “cost per color” and why setup fees often scale with number of colors.
More colors = more screens = more prep time = more setup cost.
3) What Setup Costs Actually Cover (Step-by-Step)
Setup fees can look mysterious on a quote because they show up as a single line item. But behind that one line item is a series of steps that happen before production.
Here’s what most screen print shops are paying for during setup:
Step A: Art review + print planning
Before anything is printed, the shop checks:
- Is the art usable?
- Is it vector or high-resolution?
- Will small text hold?
- Are the colors separated correctly?
- Is it sized for the print area?
- Are there thin lines that could break down on press?
This is where potential problems get caught early.
Step B: Color separations (one for each ink)
For a multi-color design, the artwork needs to be separated so each color prints in the correct place.
Even if your design “looks like one image,” printing it is a layered process. The shop creates individual “layers” of color.
Step C: Film output / positives
To put artwork onto a screen, shops typically create films (also called film positives). Think of these like highly opaque transparency sheets where the artwork blocks light.
These films are used during exposure to “burn” the design into the emulsion.
Step D: Coating the screen with emulsion
The mesh is coated with a light-sensitive emulsion and dried under controlled conditions.
This step has real material and labor cost:
- emulsion
- coating time
- drying time
- quality control (even coats matter)
Step E: Exposure (“burning” the screen)
The film is placed on the screen and exposed to light. The light hardens the emulsion except where the artwork blocks it.
Then the screen is rinsed, and the artwork area opens up.
This is where your design becomes a clean stencil.
Step F: Washout, detail cleanup, and touch-ups
After exposure, the screen is washed out and inspected:
- pinholes?
- rough edges?
- broken details?
- areas that should be blocked?
If needed, the screen gets touched up and blocked.
Step G: Taping, blocking, and edge prep
Screens are taped and blocked to control where ink can travel.
Good taping prevents:
- ink bleeding outside the design
- mess around the edges
- inconsistent prints
Step H: Press setup + registration
Now the screen has to be mounted and aligned (registered) on the press so it prints in the exact right spot.
For multi-color prints, this registration work can take time:
- aligning colors
- controlling underbase
- setting up flash cures (if needed)
- test prints
- adjustments for ink thickness and pressure
Step I: Ink mixing and testing
If your design uses custom colors (like a specific red or a PMS match), ink has to be mixed.
Even standard inks require:
- stirring
- viscosity checks
- test prints
- cure tests
Step J: Test prints and approval
A shop often does test prints before running production—especially on:
- dark shirts
- specialty garments
- large solid areas
- fine detail artwork
These tests aren’t “wasted.” They prevent production errors and ensure consistency.
All of those steps happen before the first sellable shirt is printed.
That’s why setup exists.
4) Why Setup Fees Matter More on Small Orders (and Less on Large Orders)
Setup cost is typically a fixed cost (or semi-fixed) per design/per color. The per-shirt cost decreases as quantity increases because the setup gets spread out.
Example (simple math concept)
Let’s say setup is $60 total (for illustration purposes).
- If you order 12 shirts, setup contributes $5/shirt.
- If you order 60 shirts, setup contributes $1/shirt.
- If you order 300 shirts, setup contributes $0.20/shirt.
That’s why screen printing often becomes very cost-effective at higher quantities.
The “break-even” concept
For small runs, you might compare:
- screen printing (setup + lower per-shirt)
vs - a no-setup method (higher per-shirt)
This is why many shops recommend DTF/DTG for very small quantities and screen print for larger runs—depending on design and goals.
5) Why “Per Color” Changes Price So Much
People sometimes think color count is “just more ink.” But in screen printing, it’s usually more than that.
Each additional color can mean:
- another separation layer
- another film
- another coated screen
- another exposure and washout
- another setup station on the press
- more registration time
- more test prints
- potentially more flashing (drying between colors)
- more opportunity for misregistration if rushed
So color count isn’t just a material change—it’s a process and time change.
A 1-color print can be fast
A clean one-color logo:
- one screen
- simple setup
- quick print speed
- easy consistency
A 6-color print is a full build
A 6-color print:
- 6 screens
- complex registration
- more press stops
- more curing and flashing
- slower print speed
- more QC focus
It can look amazing—but it’s more work.
6) The Difference Between “Setup Fee,” “Art Fee,” and “Digitizing Fee”
Different shops label these differently, and customers understandably mix them up.
Setup fee (screen fee / screen charge)
Usually covers the screen creation and press setup steps.
Art fee
This is typically charged when the artwork needs real modifications:
- vectorizing low-res logos
- cleaning up images
- creating separations
- redesigning an unusable file
- rebuilding text
- converting RGB to print-ready approach
Some shops bundle basic art time into setup; others separate it.
Digitizing fee (embroidery, not screen print)
Embroidery requires digitizing—converting artwork into stitch paths.
That’s a different process and is typically not part of screen print setup.
7) What Makes Setup More Expensive? (Real Cost Drivers)
If you want to predict or understand setup costs, here are the main levers:
1) Number of colors
More colors usually = more screens and setup.
2) Underbase requirements (printing on dark garments)
If you print bright colors on black shirts, you usually need a white underbase so the colors pop.
Even if your design is “one color” (like bright yellow), a shop may need:
- underbase screen (white)
- top color screen (yellow)
So it might become a 2-screen job.
3) Print size
Larger prints can:
- require larger screens
- require more ink
- require more control and test prints
- slow down production on press
4) Fine detail
Very fine lines, tiny text, and halftones can:
- require higher mesh screens
- require more precise exposure
- require more careful ink control
- increase risk of fill-in on press
That can mean more test time and more scrutiny.
5) Specialty inks or effects
Metallics, puff, glow, discharge, water-based, etc. can change setup and production time.
6) Multiple placements
A left chest + full back design often means:
- separate setups per placement
- possibly separate screens per placement
- additional press time and setup
7) Rush timelines
If a job needs to be turned around quickly, it may require:
- priority scheduling
- overtime handling
- reduced batching (less efficient production)
Rush doesn’t just affect production; it affects how the shop sequences setup and drying/exposure workflows.
8) Why Setup Costs Are Often Similar Whether You Print 2 Shirts or 200
This is the part customers often find surprising:
“If the setup is the same, why does it cost the same when I order fewer shirts?”
Because the shop still has to:
- create screens
- align/ register
- mix ink
- test print
- dial in the job
Those actions happen regardless of quantity.
The difference is that with 200 shirts, the setup gets “spread” and feels smaller. With 2 shirts, it’s still real labor and material cost.
9) Are Setup Fees “Profit”? Or Are They Real Costs?
In a legitimate print shop, setup fees reflect real cost. There are materials and labor involved:
- emulsion and reclaim chemicals
- film output media
- screen wear-and-tear
- labor time (art, exposure, washout, taping, setup, testing)
- shop overhead allocation
That said, different shops price setup differently based on:
- equipment
- staffing
- workflow speed
- quality standards
- whether they plan to reuse screens
So you’ll see variation. But the concept is sound: setup pays for the work required to make printing possible.
10) Can Setup Fees Be Reduced or Avoided?
Sometimes yes—without sacrificing quality. Here are practical ways:
1) Reduce color count
If your design can be simplified from 4 colors to 2, setup often drops.
Design tip: one-color designs with strong layout can look premium and intentional.
2) Use spot colors wisely
If you want a “multi-color look” but keep screens low, use:
- halftones
- negative space
- shading techniques
This can reduce the number of actual inks needed.
3) Reuse the same design for future runs
Many shops can save art files and separation settings. Some may also save screen specs or keep screens on file for a period.
If you plan monthly reorders, mention it. The shop may advise a workflow that saves time later.
4) Consolidate placements
Two placements cost more than one. If budget is tight, choose:
- full back only
or - left chest only
and skip the second placement.
5) Provide print-ready artwork
Print-ready art can reduce art time and speed separations.
Best practice:
- vector files (AI, EPS, SVG, PDF)
- outlined fonts
- clean layers
- correct sizing
- clear color callouts
6) Ask for a method match
If you only need a handful of shirts, it might be smarter to use a method that doesn’t require screen setup (depending on your priorities).
A good shop will guide you based on:
- quantity
- detail
- desired feel
- budget
- deadline
11) “If Setup Exists, Why Do Some Shops Not Charge Setup?”
Sometimes they do charge it—they just bury it in the per-shirt price.
You might see:
- no setup fee listed
- but a higher per-item cost
Or:
- setup is waived above a certain quantity
- because the margin on the larger order covers setup labor
Neither approach is inherently better; it’s just different pricing presentation.
12) Screen Reclaiming: What Happens After Your Job?
After production, most shops reclaim the screen:
- remove ink
- remove emulsion
- clean the mesh
- degrease
- prepare it for the next job
Reclaiming takes labor and chemicals too. It’s part of the real lifecycle cost of screens.
Some shops keep screens for repeat customers for a certain timeframe, but many reclaim quickly to keep screens available.
13) When Screen Printing Is the Best Choice (Even With Setup Fees)
Screen printing shines when you need:
- consistent results across a larger order
- durability and wash resistance
- bold prints that pop
- spot color accuracy (including PMS matching)
- speed and value at higher quantities
If you’re ordering for:
- events
- schools
- teams
- staff uniforms
- convention logistics
- large giveaways
Screen printing often becomes the most cost-effective method, setup included.
14) When Setup Fees Make Another Method More Practical
For very small orders, setups can outweigh the per-shirt savings. Another method might make sense when:
- you’re ordering 1–12 shirts
- you need full-color photo prints
- you need lots of personalization (names/number changes)
- you’re testing designs before a bigger run
The key is matching method to goals—not forcing one method for every job.
15) The Most Common “Setup Fee” Misunderstandings (and Better Ways to Think About It)
“Setup fees feel like a penalty.”
Better framing: setup fees are the cost of creating the tool (screen) that makes your print possible.
“I’m paying for nothing.”
Better framing: you’re paying for work that happens before printing. Without it, printing can’t happen.
“It shouldn’t cost that much.”
Better framing: setup includes materials, skilled labor, equipment time, test prints, and overhead. If a shop underprices setup, they often make it up elsewhere—or cut corners.
16) A Quick Example: Why Two-Color Isn’t “Just One More Color”
Let’s say you have a white shirt print with:
- black text
- red icon
A 1-color print is one screen, one setup.
A 2-color print means:
- two screens
- two separations
- two films
- two exposures
- registration time
- test prints to ensure alignment
- potentially slower printing speed
That’s why going from 1 to 2 colors can sometimes feel like a larger jump than expected. It’s not just “more ink.” It’s an additional build.
17) How to Ask Smart Questions About Setup (Without Sounding Like You’re Complaining)
If you’re trying to understand setup fees for a project, these are fair questions:
- “How many screens does this design require?”
- “Is there an underbase needed on this shirt color?”
- “Can we simplify the design to reduce screen count?”
- “If we reorder later, does anything carry over?”
- “Is the art print-ready, or will it need cleanup?”
- “Would another method be smarter at this quantity?”
A good shop will welcome these questions, because it usually leads to a better result and fewer surprises.
18) Bottom Line: Setup Fees Exist Because Screen Printing Is a Build Process
A screen printed shirt looks simple when it’s done, but screen printing is a manufacturing process, not a “click print” process.
Setup fees exist because the shop must:
- convert your design into separations
- output films
- create screens with emulsion and exposure
- prep and tape
- register screens on press
- mix ink
- run test prints
- dial in curing and consistency
Only after those steps can production begin.
And once you understand that, setup fees stop feeling like a mystery and start feeling like what they are: the real cost of making your design printable.